Previously, we introduced list views as a way to organize a set of items with corresponding detail pages. In this chapter, we want to extend this handy element with additional functionality. With the current version of Xamarin.Forms you can easily implement things like swiping items to unveil additional context actions and the famous pull-to-refresh. To keep the examples short and clear, we will split these functionalities into separate apps described in separate sections.
6.1 Adding and removing items via context actions
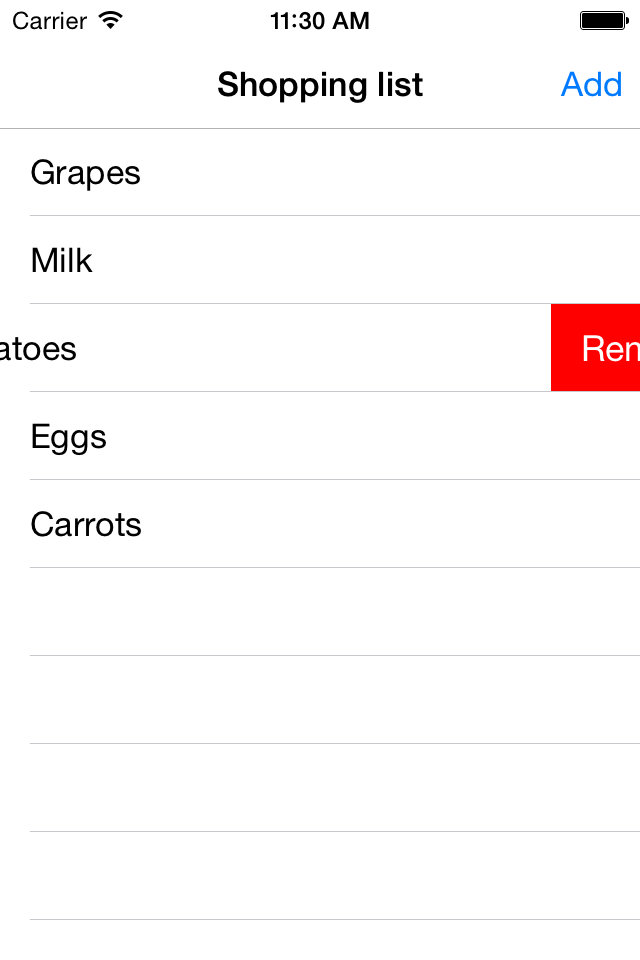
In this example we display a list of grocery items. The user will be able to insert new items as well as to delete some of them. We’ll implement the latter functionality using context actions, which were introduced with Xamarin.Forms 1.3.
Within the App constructor, we initialize an ObservableCollection filled with some strings.
var list = new ObservableCollection<string> { "Grapes", "Milk", "Potatoes", "Eggs", "Carrots" };
Note that we need to use an ObservableCollection instead of a List. Otherwise the ListView wouldn’t be able to react on list manipulations like insertions or deletions.
The MainPage contains a new ListView bound to our list and with an ItemTemplate of type ItemCell, which we’ll define in a minute. In order to be able to add toolbar items, the ContentPage is wrapped in a NavigationPage.
MainPage = new NavigationPage(new ContentPage {
Title = "Shopping list",
Content = new ListView {
ItemsSource = list,
ItemTemplate = new DataTemplate(typeof(ItemCell)),
},
});
To allow the user to add new items, we add a ToolbarItem. When pressed, the MainPage will display an action sheet with three grocery items and a “Cancel” button. If the selected item is not the “Cancel” button, we’ll add the item to the list. Since list is observable, the ListView will display the new item automatically.
MainPage.ToolbarItems.Add(new ToolbarItem {
Text = "Add",
Command = new Command(async o => {
var item = await MainPage.DisplayActionSheet("Add item", "Cancel", null, "Butter", "Cream", "Onions");
if (item != "Cancel")
list.Add(item);
}),
});
In order to allow the user to remove single items, we’ll implement a Remove event within the ItemCellclass. Here, in the App constructor, is a good place to subscribe to this event and implement the removal of the respective item.
ItemCell.Remove += item => list.Remove(item);
Note that subscribing to a static event without canceling the subscription later might cause a memory leak. In this artificial example, however, we’ll ignore this issue.
Now we’re only missing the ItemCell implementation. It basically derives from TextCell.
public class ItemCell: TextCell
The afore-mentioned event is defined as follows. It is public, static and requires a string argument identifying the item subject to deletion.
public static event Action<string> Remove = delegate { };
Note that the list could contain duplicate items. So the identity might be ambiguous. But in this simple example we’ll ignore this issue.
Within its ItemCell constructor, we bind the cell’s TextProperty to the item string itself. This is indicated by the path ".".
SetBinding(TextProperty, new Binding("."));
Furthermore, we create a new button with a caption “Remove”. The IsDestructive property yields a red background color on iOS to indicate a destructive behavior. By binding the button’s CommandParameterProperty to the item string, the string will be accessible when handling a Clicked event. Then we can invoke the static Remove event and pass the CommandParameter as an argument. Finally, we add the button to the cell’s ContextActions.
var button = new MenuItem {
Text = "Remove",
IsDestructive = true,
};
button.SetBinding(MenuItem.CommandParameterProperty, ".");
button.Clicked += (sender, e) => Remove((sender as MenuItem).CommandParameter as string);
ContextActions.Add(button);
This list of context actions is unveiled by swiping a list item to the left on iOS and by long-pressing an item on Android. The whole interaction is shown in the screenshots below.