This book focuses on building cross-platform apps with Xamarin.Forms. The main benefit of this framework is to write code once and compile it for iOS, Android and possibly Windows Phone. Although you can achieve quite a lot with shared code alone, we’ve seen examples where you need to implement some parts for each platform individually. We covered tiny modifications like an iOS-specific padding to preserve space for the status bar as well as more complex examples like gesture detection or accessing the camera.
This chapter will focus on such cross-platform code-sharing strategies and will compare six different approaches:
- Device.OS or Device.OnPlatform
- conditional compilation
- partial classes
- DependencyService
- custom renderers
- AppDelegate and MainActivity
var stack = new StackLayout {
VerticalOptions = LayoutOptions.CenterAndExpand,
HorizontalOptions = LayoutOptions.CenterAndExpand,
};
MainPage = new ContentPage { Content = stack };
Device.OS or Device.OnPlatform
Xamarin.Forms comes with a handy Device class containing two fields for distinguishing between different platforms. If you need tiny modifications like a different padding, a different font size or – as in our artificial case – a slightly different text, this is the first choice.
You can either access the current OS (operating system) and compare it to one of three TargetPlatforms
stack.Children.Add(new Label {
Text = Device.OS == TargetPlatform.iOS ? "Hello iOS target!" : "Hello Android target!",
});or call a method that returns one of three input values depending on the current platform:
stack.Children.Add(new Label {
Text = Device.OnPlatform<string>("Hello iOS platform!", "Hello Android platform!", "Hello Windows platform!"),
});
The latter is specifically useful if you have different values for all three platforms.
Conditional compilationTo obtain minor differences depending on the executing operation system, you can use conditional compilation as well. In contrast to the previous approach, only one variant is compiled.
stack.Children.Add(new Label {
#if __IOS__
Text = "Hello __iOS__!",
#elif __ANDROID__
Text = "Hello __Android__!",
#endif
});
The advantage is that, e.g., the Android part doesn’t have to compile on iOS and vice versa. This might be useful if the signature of a method on Android differs from its iOS counterpart. On the other hand, when implementing, e.g., the iOS code, there won’t be code checking, completion, syntax highlighting and refactoring support for the Android part. It’s like commenting out one part of the code – with all its pitfalls.
Partial classes
We are approaching a series of more complex strategies. They are characterized by spreading code across shared and platform-specific projects. For tiny code adaptations they are probably not worth the effort. But when implementing more evolved classes and modules, you might want to create separate files anyway.
A first possibility to spread code across multiple files is using partial classes. We can define such a class in shared code and add parts of its implementation in the platform-specific projects. It is, however, important to place all parts into the same namespace, which is usually the shared one.
Shared codeLet’s start with adding a new instance of a PartialLabel.
stack.Children.Add(new PartialLabel());
This PartialLabel is a custom partial class deriving from Xamarin.Forms’ Label. Here, within the platform-independent code, we don’t add any implementation.
public partial class PartialLabel: Label
{
}
iOS code
In the iOS project – but in the same namespace like the shared code – we add a public constructor. It simply sets the iOS-specific Text.
namespace CrossPlatform
{
public partial class PartialLabel
{
public PartialLabel()
{
Text = "Hello iOS part!";
}
}
}
Android codeSimilarly on Android, we implement the constructor with an Android-related Text.
namespace CrossPlatform
{
public partial class PartialLabel
{
public PartialLabel()
{
Text = "Hello Android part!";
}
}
}
DependencyService
Xamarin.Forms offers another way to access native features from shared code. It involves a DependencyService for registering native implementations of shared interfaces. The overall infrastructure is comparable to using partial classes.
Shared codeTo demonstrate this approach, we add a label with a Text loaded from the DependencyService. We ask for an implementation of an interface IGreeting and access the property Hello.
stack.Children.Add(new Label {
Text = DependencyService.Get<IGreeting>().Hello,
});
The interface is defined as follows. It contains one read-only property Hello.
public interface IGreeting
{
string Hello { get; }
}
iOS code
Within the iOS project we need to create an implementation of the interface IGreeting. We will call the class Greeting and register it with an assembly attribute outside of the namespace, right below the usingstatements.
[assembly:Dependency(typeof(Greeting))]The Greeting class basically implements the Hello property, returning a iOS-specific string.
public class Greeting : IGreeting
{
public string Hello { get { return "Hello iOS dependency!"; } }
}
Android code
The Android implementation is almost identical. The very same assembly attribute registers the dependency:
[assembly:Dependency(typeof(Greeting))]And up to the specific string the Greeting implementation is the same as well.
public class Greeting : IGreeting
{
public string Hello { get { return "Hello Android dependency!"; } }
}
Custom renderers
Another strategy that affects files in multiple projects is to implement custom renderers. We already used this concept for creating views with custom appearance and interactive behavior. Especially in the context of platform-specific artifacts related to visual elements, this is a common strategy. In this example it is rather cumbersome to create custom renderers only to change the label text. But it demonstrates the concept sufficiently well and simplifies the comparison to competing approaches.
Shared codeIn shared code, we first add a new label to our stack. But, since we don’t want to influence all other labels with a custom renderer, we use a new class CustomLabel.
stack.Children.Add(new CustomLabel());
The CustomLabel is derived from Label and has no other properties.
public class CustomLabel: Label
{
}
iOS code
The iOS renderer is registered using an assembly attribute placed right below the using statements. It links our CustomLabel class with the CustomLabelRenderer.
[assembly:ExportRenderer(typeof(CustomLabel), typeof(CustomLabelRenderer))]The renderer derives from LabelRenderer and sets a platform-specific label Text. Here we set the Textproperty of the Control, which is the native view element of type UILabel. Alternatively, we could set the Element.Text, which modifies the shared Xamarin.Forms element and results in modifying the Controlanyway. So this is the more direct approach:
public class CustomLabelRenderer: LabelRenderer
{
protected override void OnElementChanged(ElementChangedEventArgs<Label> e)
{
base.OnElementChanged(e);
Control.Text = "Hello iOS renderer!";
}
}
Android code
On Android both the assembly attribute
[assembly:ExportRenderer(typeof(CustomLabel), typeof(CustomLabelRenderer))]as well as the renderer implementation
public class CustomLabelRenderer: LabelRenderer
{
protected override void OnElementChanged(ElementChangedEventArgs<Label> e)
{
base.OnElementChanged(e);
Control.Text = "Hello Android renderer!";
}
}
are identical – up to the assigned string.
AppDelegate and MainActivity
Last but not least, we look into another common place for platform-specific code: the AppDelegate and MainActivity classes. Not only is this the entry point for initializing Xamarin.Forms and instantiating the App class, but we already used the OnCreate and FinishedLaunching methods for executing platform-specific code.
Shared codeWithin the shared project we could add a new label
stack.Children.Add(new Label {
Text = Greeting,
});
with a Text property referring to a public static member variable Greeting.
public static string Greeting;
So far we won’t see anything, because Greeting is null by default and so far we didn’t initialized this field.
iOS code
We place the initialization of App.Greeting into the FinishedLaunching method of the iOS app.
App.Greeting = "Hello iOS app delegate!";
Since the static member is always available, we can place this line anywhere within FinishedLaunching, but no later than LoadApplication, which refers to the value of Greeting.
Android code
On Android, we assign App.Greeting anywhere within OnCreate, but – again – no later than LoadApplication.
App.Greeting = "Hello Android activity!";
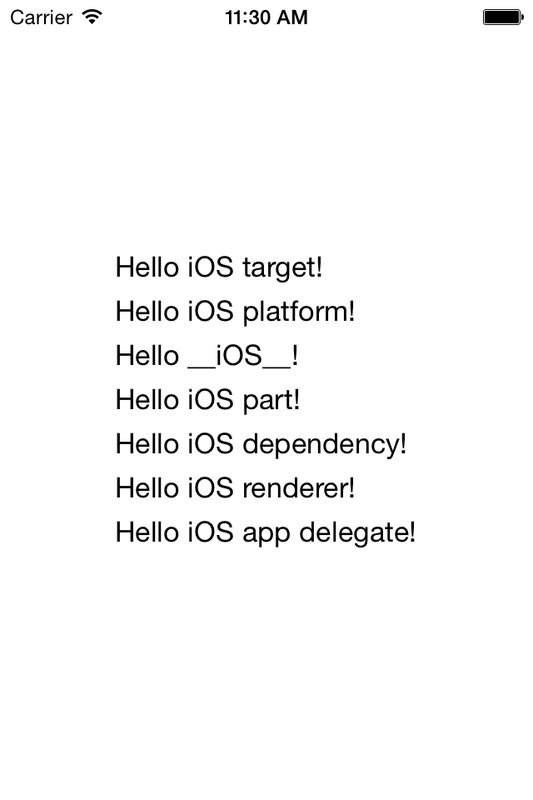
This concludes our comparison of several strategies for sharing code across cross-platform apps. The following screenshot shows the result of all the example code. Each label contains a platform-specific text generated with one of the methods described above.
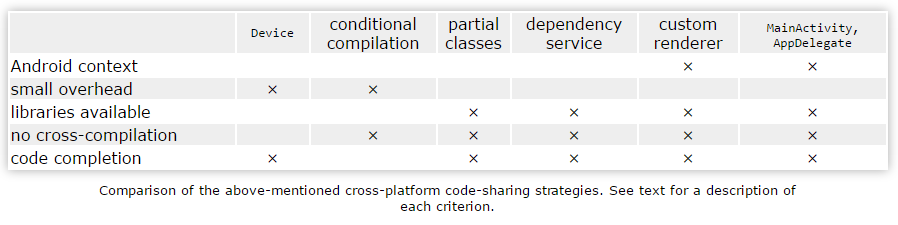
The following table compares these strategies under the following aspects:
- Android context:
Whether Android’s Context is automatically available from where the native implementation lives. E.g., the MainActivity has a Context property. But there is none in the shared code, where we would use Xamarin.Forms’ Device or conditional compilation. - Small overhead:
This criterion distinguishes between the “local” solutions like conditional compilation, that affect one file only, and the “global” solutions like custom renderers, that require classes in multiple projects. - Libraries available:
This is kind of a counterpart of “small overhead”. If the native code is directly written in shared code, there are no native libraries available. - No cross-compilation:
Some approaches “cross-compile” the Android-specific code for iOS as well and vice versa. This is an issue if one part is not compilable on both platforms. But this only occurs when using the Deviceswitch in shared code. - Code completion:
When using conditional compilation, you loose code completion, checking, syntax highlighting, analysis and refactoring support for the part that is currently deactivated.