|
Reading your skin temperature using the Microsoft Band SDK PreviewMicrosoft Band is packed with sensors that let it track your workouts. However, one sensor you don’t hear about often is the Skin Temperature sensor. This sensor allows you to read the temperature in Celsius of your skin where your Band is. There aren’t any apps built-in to Microsoft Band that make use of it directly. However, as a developer you can take readings from that sensor from an app on your phone using theMicrosoft Band SDK Preview. The SDK is very preliminary and you can only do a handful of functions from a phone including reading the sensors, creating tiles and sending notifications, and changing the theme and background image. It has a direct dependency on the app you deploy to your phone. You can’t actually build an app and deploy it so that it runs on Microsoft Band natively. This limits you quite a bit, but you can still do a few cool things. For my example, I worked off the Sensors example project for Windows Phone 8.1 and made some customizations. The app consist of a simple button that initiates our connection to the Band and starts taking readings. You can customize the Sensors project as well or you can grab my copy from GitHub. You can get the SDK from nuget by using the following command. This will add the necessary project references. Install-Package Microsoft.Band -Pre Start by editing the XML of the Package.appxmanifest file and add the DeviceCapability section for Microsoft Band inside the Capabilities element. <DeviceCapability Name="bluetooth.rfcomm"xmlns="http://schemas.microsoft.com/appx/2013/manifest"> <Device Id="any"> <!-- Used by the Microsoft Band SDK Preview --> <Function /> <!-- Used by the Microsoft Band SDK Preview --> <Function /> </Device> </DeviceCapability> You also need to add the Proximity capability as well but you can do that through the UI. Now, we’ll work on adding some functionality to MainPage.xaml. This consists mainly of a few TextBlocks and a Button. Clicking the button will invoke our code to connect to Band and take a reading. Create an event handling method for the button and mark it with async. Now, we first need to get the paired Bands to the phone. This assumes you have already paired your Band in the Bluetooth settings of the phone. // Get the list of Microsoft Bands paired to the phone. IBandInfo[] pairedBands = await BandClientManager.Instance.GetBandsAsync(); if (pairedBands.Length < 1) { this.textBlock.Text = "Band not paired."; return; } To connect to Band we create an IBandClient in a using block. using (IBandClient bandClient = awaitBandClientManager.Instance.ConnectAsync(pairedBands[0])) { } Now we can read from the Skin Temperature sensor. To do this, we bind an event handling method to theReadingChanged event of the SkinTemperature class. We’ll cover the event handling method just below. bandClient.SensorManager.SkinTemperature.ReadingChanged += SkinTemperature_ReadingChanged; Finally, we call StartReadingsAsync to start taking readings from Band. We follow it with a delay of a minute before calling StopReadingsAsync to stop taking readings. await bandClient.SensorManager.SkinTemperature.StartReadingsAsync(); await Task.Delay(TimeSpan.FromMinutes(1)); await bandClient.SensorManager.SkinTemperature.StopReadingsAsync(); In the event handling method, the value of e has a type ofBandSensorReadingEventArgs<IBandSkinTemperatureReading>. We can get the skin temperature in Celsius by using the SensorReading property. For us Americans, we can convert that to Fahrenheit. You know the formula right? C * (9/5) + 32. :). Using the Dispatcher, we then write the value of the reading to the UI. private async void SkinTemperature_ReadingChanged(object sender,BandSensorReadingEventArgs<IBandSkinTemperatureReading> e) { IBandSkinTemperatureReading temperatureReading = e.SensorReading; string text = string.Format("Temperature: {0}C", temperatureReading.Temperature); await Dispatcher.RunAsync(CoreDispatcherPriority.Normal, () => {this.textBlock.Text = text; }).AsTask(); } Now you are ready to run the program on your Windows Phone and see how hot you are! Plug your Windows Phone into your PC via the USB port and then debug the program and be sure you choose Device in the options. You can’t do this with the emulator. 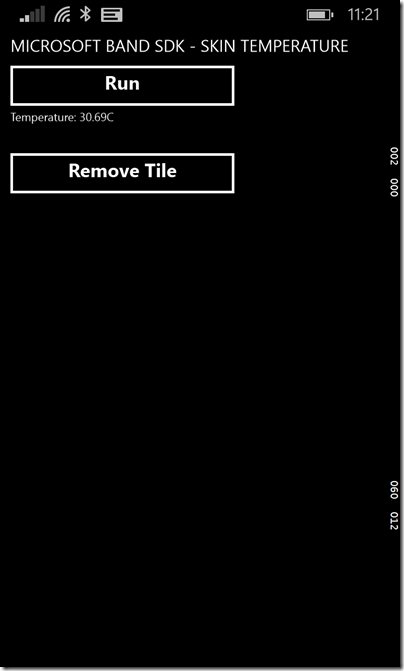 There you have it, my skin temperature was 30.69 Celsius (87.42 Fahrenheit). Now you might be thinking now, “ok, neat, but how do I see that information on my Band”. Well, you can push that information to your Band using a Tile. In fact, I’ve included that code in my repo on GitHub. However, you can only push information to your Band when the Windows Phone app is running. That’s not all that useful. I’ll cover tiles in a future post, but if you want to try it out for yourself, you can grab my code from GitHub. I would have included it today but I found that adding tiles so far doesn’t always work as expected. Maybe it will for you.
This example really has zero practical value but I expect that we’ll see more opened up in the API in future versions. If you have been interested in seeing what you can do with it as a developer, it’s worth checking out though. For more examples of working with Band across platforms, be sure and check out the published documentation. References : http://www.dotnetmafia.com/blogs/dotnettipoftheday/archive/2015/03/31/reading-your-skin-temperature-using-the-microsoft-band-sdk-preview.aspx  Thank to @juanpaexpedite for his effort help the community for Windows 10 App Development.
You can get this first Cheat Sheet at full resolution here / References : http://expediteapps.com/blog/ So, now we’ve got ourselves connected with the Band and have learned how to access the sensors. The next logical step is getting your tile onto the Band. If you’re familiar with the Band by now, you’ll be very familiar with it’s Windows style app tiles which reside to the right of your ‘Me Tile’. This tutorial will walk you through how to get your app tile into that area.
How many tiles remain? One of the first things we need to do before we can put our tile onto the Band however is to check if we have enough space for it. Unfortunately, the Band doesn’t allow for tens of apps on it at one time and this limitation means that if there isn’t enough space, you can’t activate your own tile on it. Luckily the BandClient exposes the TileManager which has a nifty method called GetRemainingTileCapacityAsync. The method returns an integer value which you can use when you’re ready to add a new tile as follows: private async void GetTileCapacity() { this.RemainingSpace = await this.BandClient.TileManager.GetRemainingTileCapacityAsync(); } Adding a tile If we have space, now is the perfect time to register your tile with the Band. We do this by creating a new BandTile and calling the AddTileAsync method on the TileManager from our BandClient. Before we do that however, we’ll need to create two icons. These two icons are for if we decided that we want to use Badging on the Band tile itself. Badging, basically, allows the tile on the Band to show the number of notifications that haven’t been looked at by the wearer, usually when the Band is in it’s sleep or locked state. These icons will need to be in two sizes, one that is 46 x 46 pixels and another that is 24 x 24. The reason for using two is that when the tile shows the number of notifications unread, it decreases the size of the icon and pushes it up. Now when we’ve done that, we need to create our tile as follows: private async void AddTile() { var tileId = Guid.NewGuid(); var tile = new BandTile(tileId) { Name = "Your tile name", IsBadgingEnabled = true, TileIcon = (await this.GetBitmapFromFile("ms-appx:///your-tile-location.png")).ToBandIcon(), SmallIcon = (await this.GetBitmapFromFile("ms-appx:///your-small-tile-location.png")).ToBandIcon) } await this.BandClient.TileManager.AddTileAsync(tile); } private async Task<WriteableBitmap> GetBitmapFromFile(string uri) { var file = await StorageFile.GetFileFromApplicationUriAsync(new Uri(uri)); using(var fileStream = await file.OpenAsync(FileAccessMode.Read) { var bitmap = new WriteableBitmap(1, 1); await bitmap.SetSourceAsync(fileStream); return bitmap; } } This will happily add a new tile to the connected Microsoft Band. References: http://jamescroft.co.uk/blog/wearable/developing-for-microsoft-band-with-winrt-tiles/ Once we have the connection, we will be able to access all of the features from the connected band. So now we will have something more on the lines of this:
public IBandClient BandClient { get; set; } private async Task ConnectToBand() { if (this.BandClient == null) { var bandInfo = (await BandClientManager.Instance.GetBandsAsync()).FirstOrDefault(); try { this.BandClient = await BandClientManager.Instance.ConnectAsync(bandInfo); } catch (BandException) { // The Microsoft Band failed due to either being too far for the Bluetooth to connect or it is turned off. } } } private void DisconnectFromBand() { if (this.BandClient != null) { this.BandClient.Dispose(); this.BandClient = null; } } These two methods you can use to connect and disconnect from your default connected Band of your Windows Phone or Windows PC. You’ll need to handle disconnecting so that you can release the connection from the Band with your app when your app suspends, as an example. Accessing SensorsThere are a variety of sensors within your Band, some of which aren’t currently exposed by default for user viewing such as skin temperature. Here is a quick list of the sensors that you can attach to in order to read from them:
Accessing these sensors in your app is relatively easy as the sensors themselves are exposed through the SensorManager of your IBandClient instance. Each sensor has the ability to be capped and only read based on an interval, although for some of the sensors, you’ll most likely be constantly reading. So let us dive into connecting to one of the sensors. The method for doing so is the same for all of the sensors. First, we’ll need to create a model that we can feed the information from the sensors into. In this example, I’m going to show how we’ll work with the Motion sensor. namespace MicrosoftBand.Models.Sensors { public class Motion { public double AccelX { get; set; } public double AccelY { get; set; } public double AccelZ { get; set; } public double GyroX { get; set; } public double GyroY { get; set; } public double GyroZ { get; set; } } } You’ll then implement the functionality to connect to the sensor and start reading from it as follows: public Motion MotionModel { get; set; } private async Task StartMotion() { if (this.BandClient.SensorManager.Gyroscope.IsSupported) { this.MotionModel = new Motion(); this.BandClient.SensorManager.Gyroscope.ReportingInterval = TimeSpan.FromMilliseconds(128.0); this.BandClient.SensorManager.Gyroscope.ReadingChanged += this.OnMotionReadingChanged; await this.BandClient.SensorManager.Gyroscope.StartReadingsAsync(); } } private async Task StopMotion() { this.BandClient.SensorManager.Gyroscope.ReadingChanged -= this.OnMotionReadingChanged; await this.BandClient.SensorManager.Gyroscope.StopReadingsAsync(); } private void OnMotionReadingChanged(object sender, BandSensorReadingEventArgs<IBandGyroscopeReading> e) { this.MotionModel.AccelX = e.SensorReading.AccelerationX; this.MotionModel.AccelY = e.SensorReading.AccelerationY; this.MotionModel.AccelZ = e.SensorReading.AccelerationZ; this.MotionModel.GyroX = e.SensorReading.AngularVelocityX; this.MotionModel.GyroY = e.SensorReading.AngularVelocityY; this.MotionModel.GyroZ = e.SensorReading.AngularVelocityZ; } If you’re wanting to keep track of the times of these readings, your BandSensorReadingEventArgs exposes a property on the SensorReading which is a timestamp of the reading. This will be useful if you’re wanting to do any analytics on the information you’re receiving from the Band in your application. References: http://jamescroft.co.uk/blog/wearable/developing-for-microsoft-band-with-winrt-sensors/ |

Archives
June 2020
Categories
All
|
Photos used under Creative Commons from derkamener1984, justgrimes
