Custom fonts allow us to illustrate our UI with icons. In contrast to using bitmaps, there are several advantages:
- Assuming you have a suitable icon font at hand, adding the icons to the solution is fast and easy. You only need to add and maintain a single file per platform.
- Loading page with many icons will take noticeably longer than loading labels. The different font does not cost any time – except when loading the font once at app start. Furthermore, we won’t see any delay between displaying the other visual elements and then the icons.
- Icon fonts are – like vector graphics in general – scalable. Thus we don’t need to prepare different resolutions, but will see optimal quality on any screen.
- Each icon can only consist of one color on a transparent background. We will be able to adjust the color via the font color and set a background color as well, but multi-color icons can’t be converted to fonts.
- Creating a font with custom icons requires a bit more time and special software (which is freely available).
Getting icon fonts
On the afore-mentioned website dafont you not only find fonts for normal text, but icon fonts as well, called “dingbats”. For icons, there are dedicated sites like flaticon.com4, that allow you to create your on collection of free icons and download them in various formats including TTF fonts.
Creating your own icon fontIn case you don’t find a suitable icon on a website offering TTF downloads, or if you get single vector images for your app from a designer, you might wish to create a custom icon font. The following steps describe the procedure using the free font editor FontForge.
- (Optional, in case SVG graphics are not already available) You need to convert the images into scalable vector graphics (SVG): Open the images with the free vector image editor Inkscape and save them as “Plain SVG” files.
- Scale the SVG images to a size of 1024 × 1024 pixels.
You can use the bash command
rsvg-convert original.svg -w 1024 -h 1024 -f svg -o scaled.svgor wrap it with a for-loop:
for file in *.svg
do
rsvg-convert "$file" -w 1024 -h 1024 -f svg -o "${file/.svg/_scaled.svg}"
done - Open FontForge and tweak two important settings:
- Set a font name:
“Element” → “Font Info”… → “Font name” - Set the glyph size to 1024 pixels:
“Element” → “Font Info…” → “General” → “Em Size”: “1024”
- Set a font name:
- Double-click on a glyph to fill it with an SVG image.
- Import the SVG.
- (Optional, in case you don’t see the graphic)
Display filled areas:
“View” → “Show” → “Fill” - (Optional, in case the filled area is incorrect)
You might need to fix the orientation of the contours, until the correct areas are filled:
Double-click on a contour and click “Element” → “Reverse Orientation” - Export the font as a True Type Font (TTF) file:
“File” → “Generate Fonts”
(There might occur conflicts, which are usually not critical and can be ignored.)
Working with icon fonts
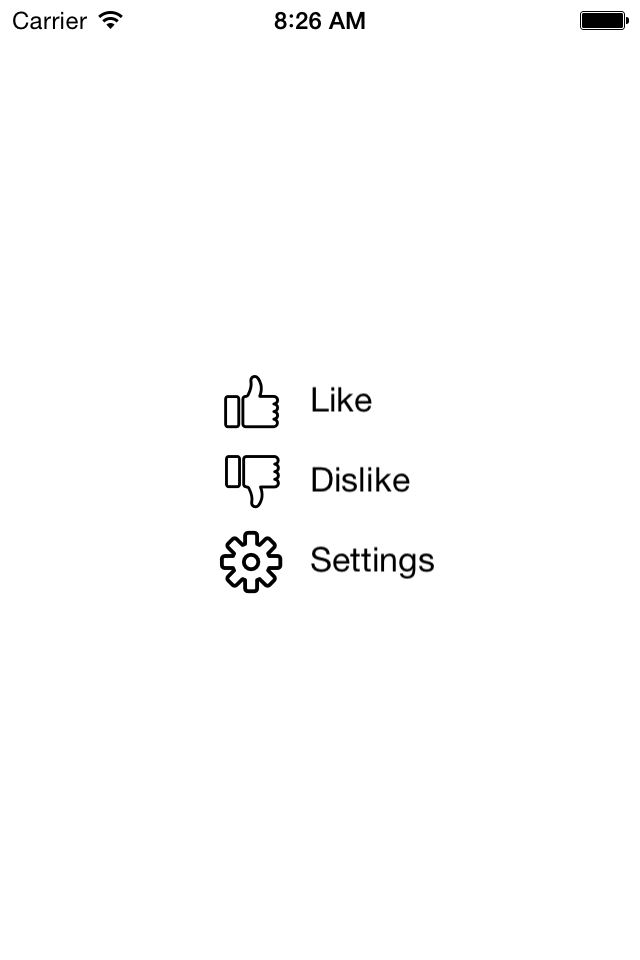
To demonstrate the usage of icon fonts, we create a simple MainPage containing a StackLayout filled with three StackRows. Each row contains an icon and a label and is – to avoid duplicate code – defined in a separate class.
MainPage = new ContentPage {
Content = new StackLayout {
HorizontalOptions = LayoutOptions.CenterAndExpand,
VerticalOptions = LayoutOptions.CenterAndExpand,
Children = {
new StackRow(VectorIcon.Like, "Like"),
new StackRow(VectorIcon.Dislike, "Dislike"),
new StackRow(VectorIcon.Settings, "Settings"),
},
},
};
A StackRow itself is a StackLayout with horizontal orientation, i.e. its child elements are arranged horizontally. The first child is a Label displaying the icon character with our Icons font and a rather large font size. The second child is a normal Label.
public class StackRow: StackLayout
{
public StackRow(char icon, string text)
{
Orientation = StackOrientation.Horizontal;
Children.Add(new Label {
Text = icon.ToString(),
FontFamily = Device.OS == TargetPlatform.iOS ? "Icons" : "Icons.ttf",
FontSize = 48,
VerticalTextAlignment = TextAlignment.Center,
});
Children.Add(new Label {
Text = text,
VerticalTextAlignment = TextAlignment.Center,
});
}
}
The VectorIcon is the important class in this example. It lists the corresponding character for each icon stored in the icon font. This allows an easy access at implementation time, even with code completion, like in the example code above: VectorIcon.Like.
public static class VectorIcon
{
public static readonly char Dislike = 'D';
public static readonly char Like = 'L';
public static readonly char Settings = 'S';
}
After adding the TTF file to the iOS project and registering it in the “Info.plist” – as described above –, we’ll already see our new icons. On Android we not only need to add the TTF file to the Assets folder, but need to add a custom renderer to actually use the typeface for the underlying control:
if (Element.FontFamily != null)
Control.Typeface = Typeface.CreateFromAsset(Forms.Context.Assets, Element.FontFamily);