A different approach to react on user input is to use triggers. Xamarin.Forms provides four types of triggers, which we will plug into one joint example application. The app will contain two entry fields and a label to display additional information. Both the nameEntry and the ageEntry have an empty Text and an informative Placeholder. (Although skipping the Text property would yield the same result, we need to set it to an empty string in order to get the triggers working properly.)
var nameEntry = new Entry {
Text = "",
Placeholder = "Name",
};
var ageEntry = new Entry {
Text = "",
Placeholder = "Age",
};
The infoLabel will have its text horizontally centered. Its HeightRequest is set to a fixed value in order to prevent the whole layout to jump up and down when the label text is filled or cleared.
var infoLabel = new Label {
HorizontalTextAlignment = TextAlignment.Center,
HeightRequest = 20,
};
We place all three elements centered on the page using a StackLayout. In the following we will add different types of triggers that will implement visual feedback depending on the user input.
MainPage = new ContentPage {
Content = new StackLayout {
VerticalOptions = LayoutOptions.CenterAndExpand,
Children = {
nameEntry,
ageEntry,
infoLabel,
},
},
};
Property triggersThe first type of triggers are property triggers. They observe a certain property and apply their setters as soon as a pre-defined value is reached.
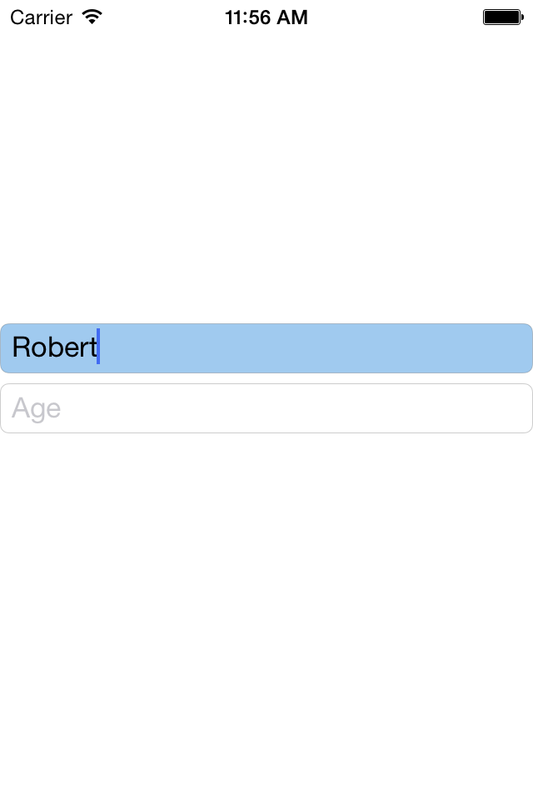
In this example, we will set a blue background color, when the user enters the name “Robert”. First, we implement the corresponding setter.
var blueBackground = new Setter {
Property = VisualElement.BackgroundColorProperty,
Value = Color.FromRgba(65, 149, 223, 127),
};
The trigger for visual elements of type Entry observes the TextProperty and – as soon as the Value is "Robert" – applies the blueBackground setter.
var textIsRobert = new Trigger(typeof(Entry)) {
Property = Entry.TextProperty,
Value = "Robert",
Setters = { blueBackground },
};
Last but not least, we only need to add the trigger to the nameEntry.
nameEntry.Triggers.Add(textIsRobert);
Styles with property triggers
We can add triggers to styles as well. So we could define a triggerStyle containing the textIsRoberttrigger
var triggerStyle = new Style(typeof(Entry)) {
Triggers = { textIsRobert },
};
and attach the style to the nameEntry:
nameEntry.Style = triggerStyle;
Data triggers
Data triggers are similar to property triggers, but
var sayEnterName = new Setter {
Property = Label.TextProperty,
Value = "Please enter a name.",
};
and add it to a noName trigger for UI elements of type Label:
var noName = new DataTrigger(typeof(Label)) {
Binding = new Binding("Text.Length", source: nameEntry),
Value = 0,
Setters = { sayEnterName },
};
In this case we only evaluate the Length property of the entry text. Using a converter we could refer to deducted information like “valid” or “too long” as well. Our converter would simply need to convert a stringinput value into a bool return value.
Finally, we add the noName trigger to the infoLabel. Like a property trigger, the data trigger is assigned to the UI element it modifies, although it listens to a different input element.
infoLabel.Triggers.Add(noName);
Event triggers
Maybe the most natural type of triggers are event triggers. They listen to a certain event and react with a trigger action. Such an action might be the validation of a numerical input. Depending on whether the entered text can be converted to a floating-point number, the TextColor is set to either the default color or Red.
public class NumericValidationTriggerAction : TriggerAction<Entry>
{
protected override void Invoke(Entry sender)
{
double result;
var isValid = double.TryParse(sender.Text, out result);
sender.TextColor = isValid ? Color.Default : Color.Red;
}
}
With a new instance of our NumericValidationTriggerAction we can define a new EventTrigger observing the "TextChanged" event of the ageEntry. Whenever the text changes, the trigger action is invoked and the TextColor is updated accordingly.
ageEntry.Triggers.Add(new EventTrigger {
Event = "TextChanged",
Actions = { new NumericValidationTriggerAction() },
});
Multi triggers
The last type of triggers are multi triggers. They allow us to apply setters when multiple conditions are met. For this example, we want the infoLabel to display the greeting “Hi Peter!” when the entered name is “Peter” and the age is “30”. Therefore, we define the sayHiPeter setter as follows.
var sayHiPeter = new Setter {
Property = Label.TextProperty,
Value = "Hi Peter!",
};
We use it to create a peter30 trigger with two conditions: The Text of the nameEntry has to have the Value "Peter". And the Text of the ageEntry has to have the Value "30". Since we refer to a different UI element than which will be modified by the setter, we need to use BindingConditions. Otherwise we could use PropertyConditions as well.
var peter30 = new MultiTrigger(typeof(Label)) {
Conditions = {
new BindingCondition {
Binding = new Binding(Label.TextProperty.PropertyName, source: nameEntry),
Value = "Peter",
},
new BindingCondition {
Binding = new Binding(Label.TextProperty.PropertyName, source: ageEntry),
Value = "30",
},
},
Setters = { sayHiPeter },
};
Now we simply add the peter30 trigger to the infoLabel. Whenever both conditions are met, the sayHiPeter setting will change the Text property of this label.
infoLabel.Triggers.Add(peter30);
var nameEntry = new Entry {
Text = "",
Placeholder = "Name",
};
var ageEntry = new Entry {
Text = "",
Placeholder = "Age",
};
The infoLabel will have its text horizontally centered. Its HeightRequest is set to a fixed value in order to prevent the whole layout to jump up and down when the label text is filled or cleared.
var infoLabel = new Label {
HorizontalTextAlignment = TextAlignment.Center,
HeightRequest = 20,
};
We place all three elements centered on the page using a StackLayout. In the following we will add different types of triggers that will implement visual feedback depending on the user input.
MainPage = new ContentPage {
Content = new StackLayout {
VerticalOptions = LayoutOptions.CenterAndExpand,
Children = {
nameEntry,
ageEntry,
infoLabel,
},
},
};
Property triggersThe first type of triggers are property triggers. They observe a certain property and apply their setters as soon as a pre-defined value is reached.
In this example, we will set a blue background color, when the user enters the name “Robert”. First, we implement the corresponding setter.
var blueBackground = new Setter {
Property = VisualElement.BackgroundColorProperty,
Value = Color.FromRgba(65, 149, 223, 127),
};
The trigger for visual elements of type Entry observes the TextProperty and – as soon as the Value is "Robert" – applies the blueBackground setter.
var textIsRobert = new Trigger(typeof(Entry)) {
Property = Entry.TextProperty,
Value = "Robert",
Setters = { blueBackground },
};
Last but not least, we only need to add the trigger to the nameEntry.
nameEntry.Triggers.Add(textIsRobert);
Styles with property triggers
We can add triggers to styles as well. So we could define a triggerStyle containing the textIsRoberttrigger
var triggerStyle = new Style(typeof(Entry)) {
Triggers = { textIsRobert },
};
and attach the style to the nameEntry:
nameEntry.Style = triggerStyle;
Data triggers
Data triggers are similar to property triggers, but
- can observe a different UI element via bindings and
- can derive more complex data using value converters.
var sayEnterName = new Setter {
Property = Label.TextProperty,
Value = "Please enter a name.",
};
and add it to a noName trigger for UI elements of type Label:
var noName = new DataTrigger(typeof(Label)) {
Binding = new Binding("Text.Length", source: nameEntry),
Value = 0,
Setters = { sayEnterName },
};
In this case we only evaluate the Length property of the entry text. Using a converter we could refer to deducted information like “valid” or “too long” as well. Our converter would simply need to convert a stringinput value into a bool return value.
Finally, we add the noName trigger to the infoLabel. Like a property trigger, the data trigger is assigned to the UI element it modifies, although it listens to a different input element.
infoLabel.Triggers.Add(noName);
Event triggers
Maybe the most natural type of triggers are event triggers. They listen to a certain event and react with a trigger action. Such an action might be the validation of a numerical input. Depending on whether the entered text can be converted to a floating-point number, the TextColor is set to either the default color or Red.
public class NumericValidationTriggerAction : TriggerAction<Entry>
{
protected override void Invoke(Entry sender)
{
double result;
var isValid = double.TryParse(sender.Text, out result);
sender.TextColor = isValid ? Color.Default : Color.Red;
}
}
With a new instance of our NumericValidationTriggerAction we can define a new EventTrigger observing the "TextChanged" event of the ageEntry. Whenever the text changes, the trigger action is invoked and the TextColor is updated accordingly.
ageEntry.Triggers.Add(new EventTrigger {
Event = "TextChanged",
Actions = { new NumericValidationTriggerAction() },
});
Multi triggers
The last type of triggers are multi triggers. They allow us to apply setters when multiple conditions are met. For this example, we want the infoLabel to display the greeting “Hi Peter!” when the entered name is “Peter” and the age is “30”. Therefore, we define the sayHiPeter setter as follows.
var sayHiPeter = new Setter {
Property = Label.TextProperty,
Value = "Hi Peter!",
};
We use it to create a peter30 trigger with two conditions: The Text of the nameEntry has to have the Value "Peter". And the Text of the ageEntry has to have the Value "30". Since we refer to a different UI element than which will be modified by the setter, we need to use BindingConditions. Otherwise we could use PropertyConditions as well.
var peter30 = new MultiTrigger(typeof(Label)) {
Conditions = {
new BindingCondition {
Binding = new Binding(Label.TextProperty.PropertyName, source: nameEntry),
Value = "Peter",
},
new BindingCondition {
Binding = new Binding(Label.TextProperty.PropertyName, source: ageEntry),
Value = "30",
},
},
Setters = { sayHiPeter },
};
Now we simply add the peter30 trigger to the infoLabel. Whenever both conditions are met, the sayHiPeter setting will change the Text property of this label.
infoLabel.Triggers.Add(peter30);